
Inkscape Tutorial: How to Make a Scientific Poster

Published on 30 Aug 2023
Designing an effective poster for a conference can be a challenging task, as it requires capturing the attention of attendees while conveying key scientific information.
If you are reading this article, you are probably looking for guidelines and tips to create visually appealing and informative posters that effectively communicate your research.
You’ve come to the right place. Let's dive in!
What is Inkscape?
Among the large scope of candidates in the graphic design software landscape, Inkscape is one of the best options. It’s a free and open-source vector graphics editor.
It offers a range of tools and features for creating high quality illustrations, logo designs, icons, and scientific posters of course.
If you want to give it a try, you can download it here.
The interface
Besides the format and the poster orientation which can be mandatory according to conference guidelines, or can depend on the size of the display stand, here are four settings to adjust.
Note: only Windows shortcuts are mentioned (and not mac OS or linux) in order to lighten the text.
1. Document properties
First, go to File > Document properties (or shift+ctrl+D). Take a look at Figure 1 to see what these settings look like in the interface.
- Format. Select among all the usual ones.
- Orientation. Select landscape or portrait.
- Border shadow. Deselect for better results.
- Page + Desk color. Modify them to your convenience. We recommend using a blank desk with a colored page background to enhance contrast.
- Guides. Create horizontal and vertical lines around the page that you can move to your convenience for creating your layout or positioning elements.
- Grid. Very useful to make relative positioning of your boxes so you’re not a few pixels off.
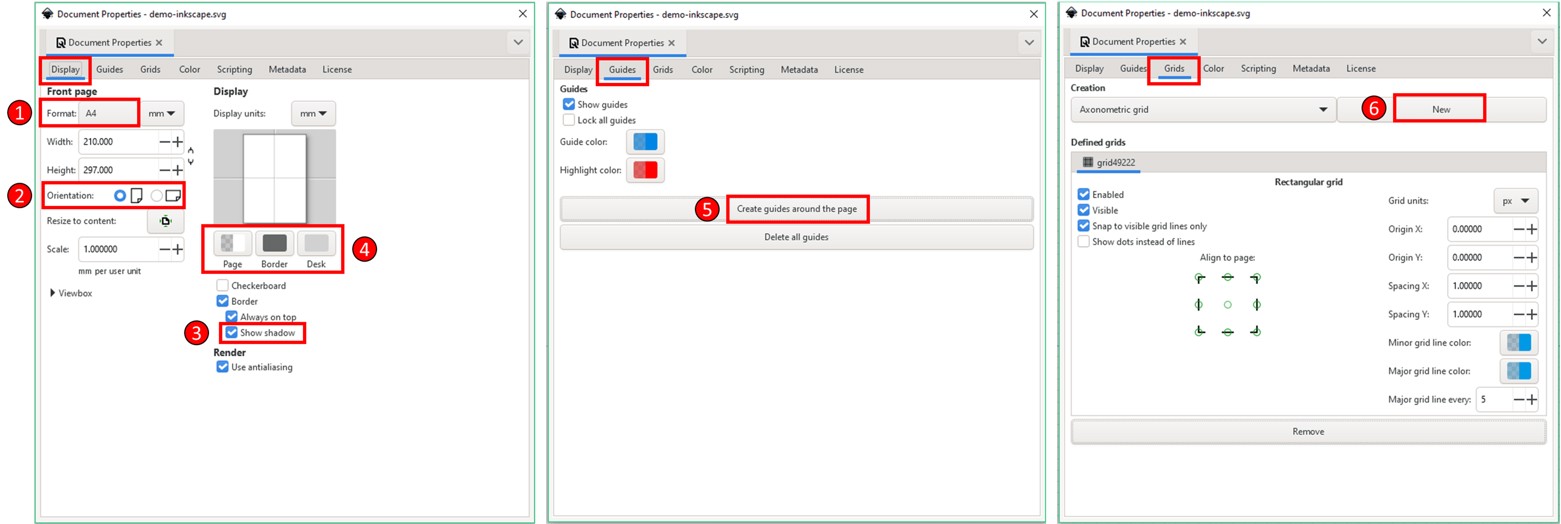
Figure 1: Document properties windows for Display (left), Guides (center) and Grids (right).
If you decide to activate all the options mentioned above, your canva will look as in Figure 2.
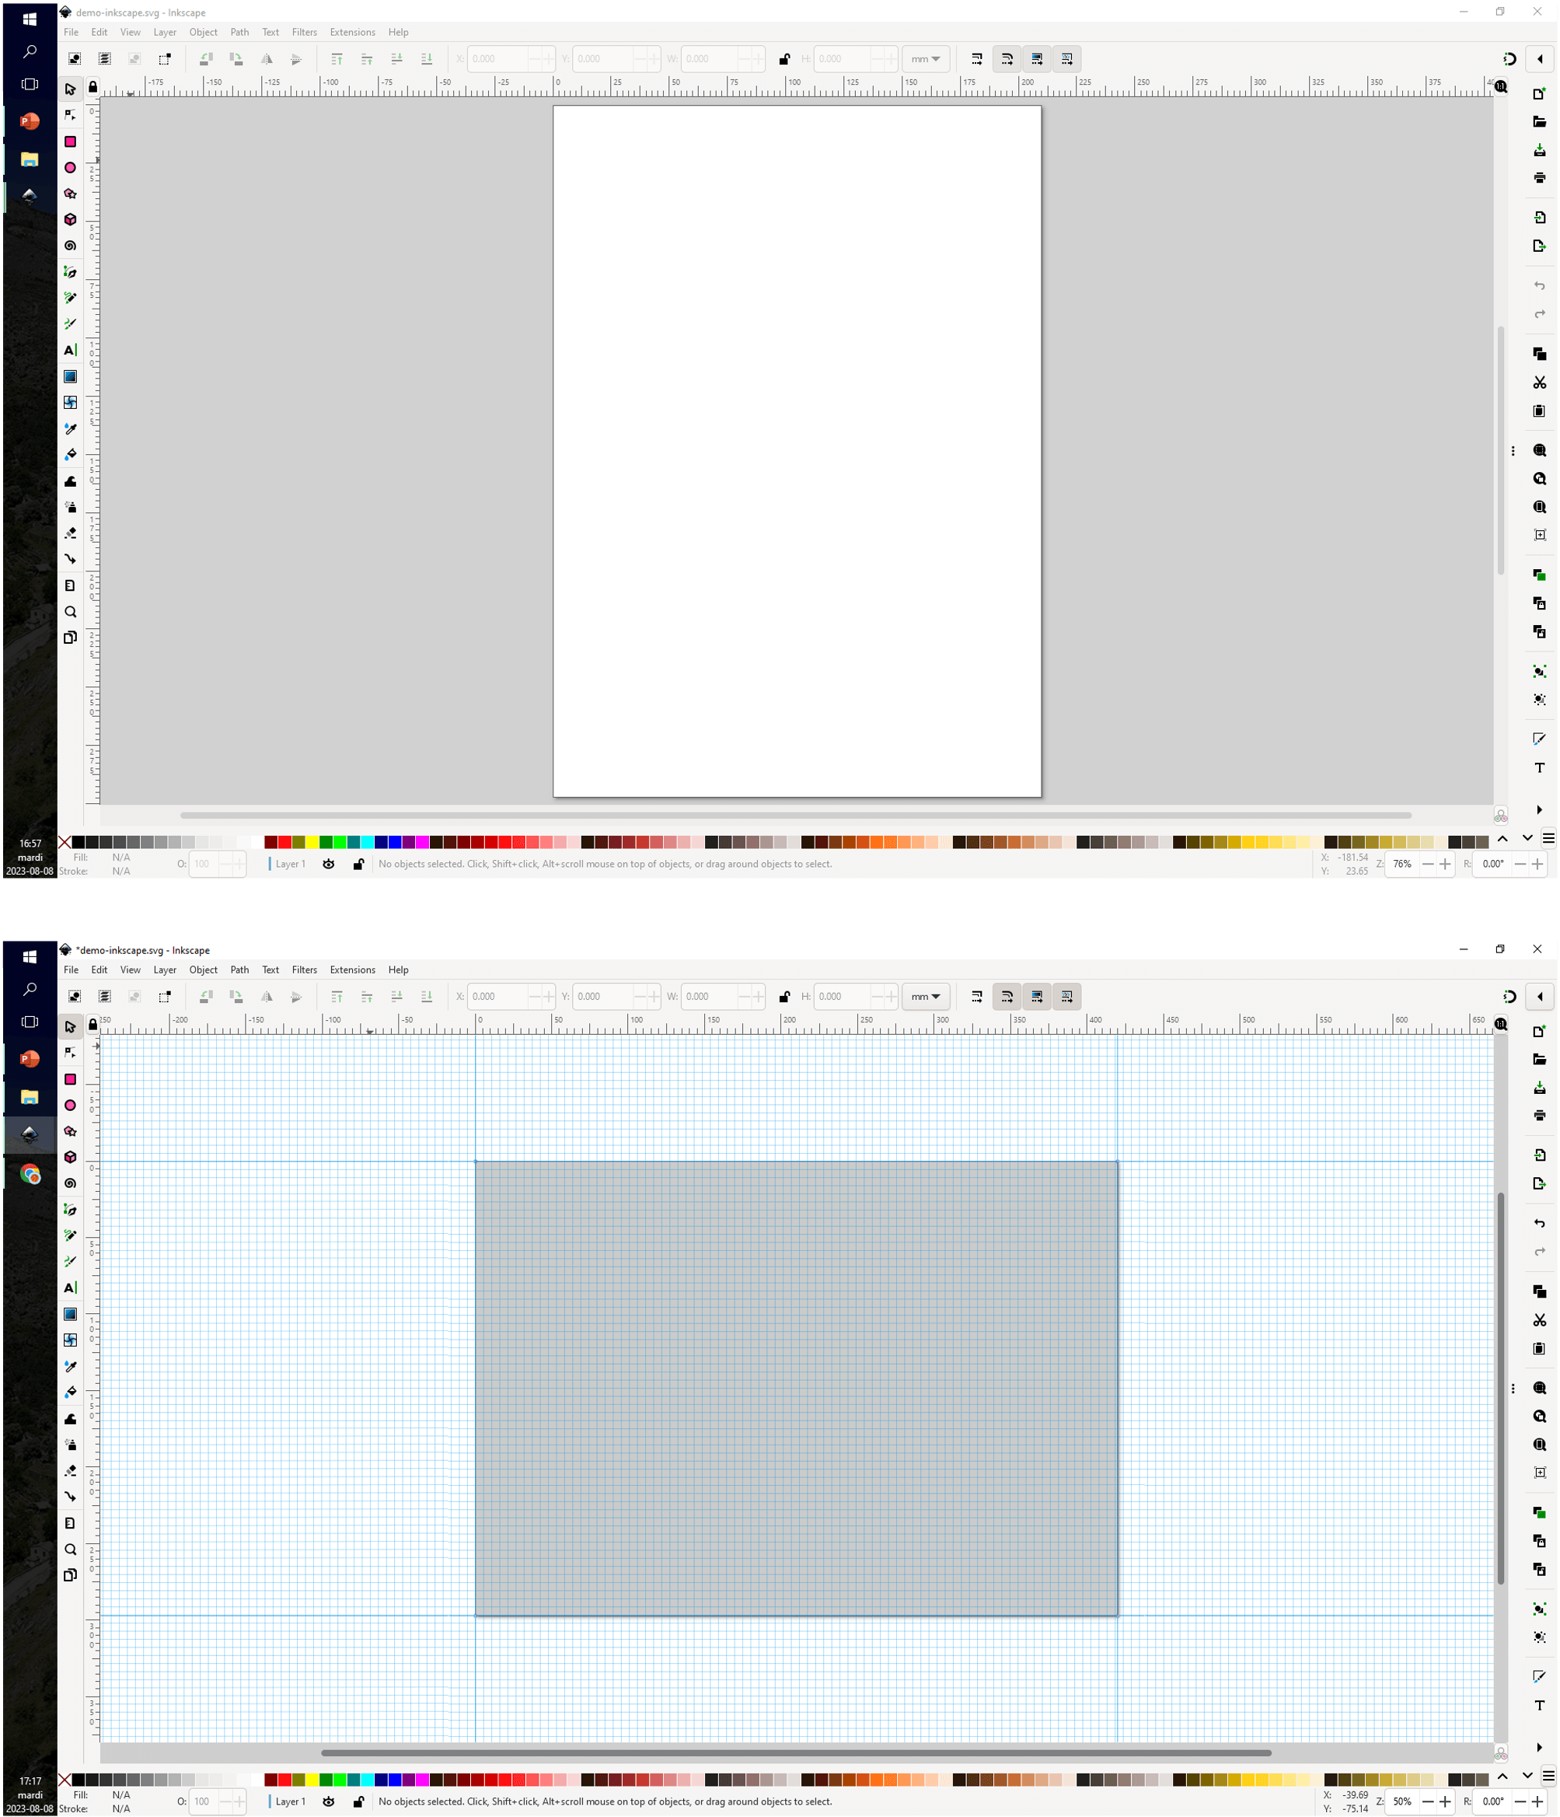
Figure 2: Start page (top) and A3 landscape-oriented page with guides and grid ready to design (bottom).
2. The side panel
Along the design process, the side panel will become your best friend. If not visible, open it by clicking the 3 dots on the right (cf. Figure 3). Three option panels are essential: Fill and Stroke, Layers and Objects and Export. If they are not visible, open them by clicking Object > Fill and Stroke (ctrl+shift+F), Layers > Layers and Objects (ctrl+shift+L), File > Export (ctrl+shift+E) or by using their shortcuts. Trust me, you will use them a lot.
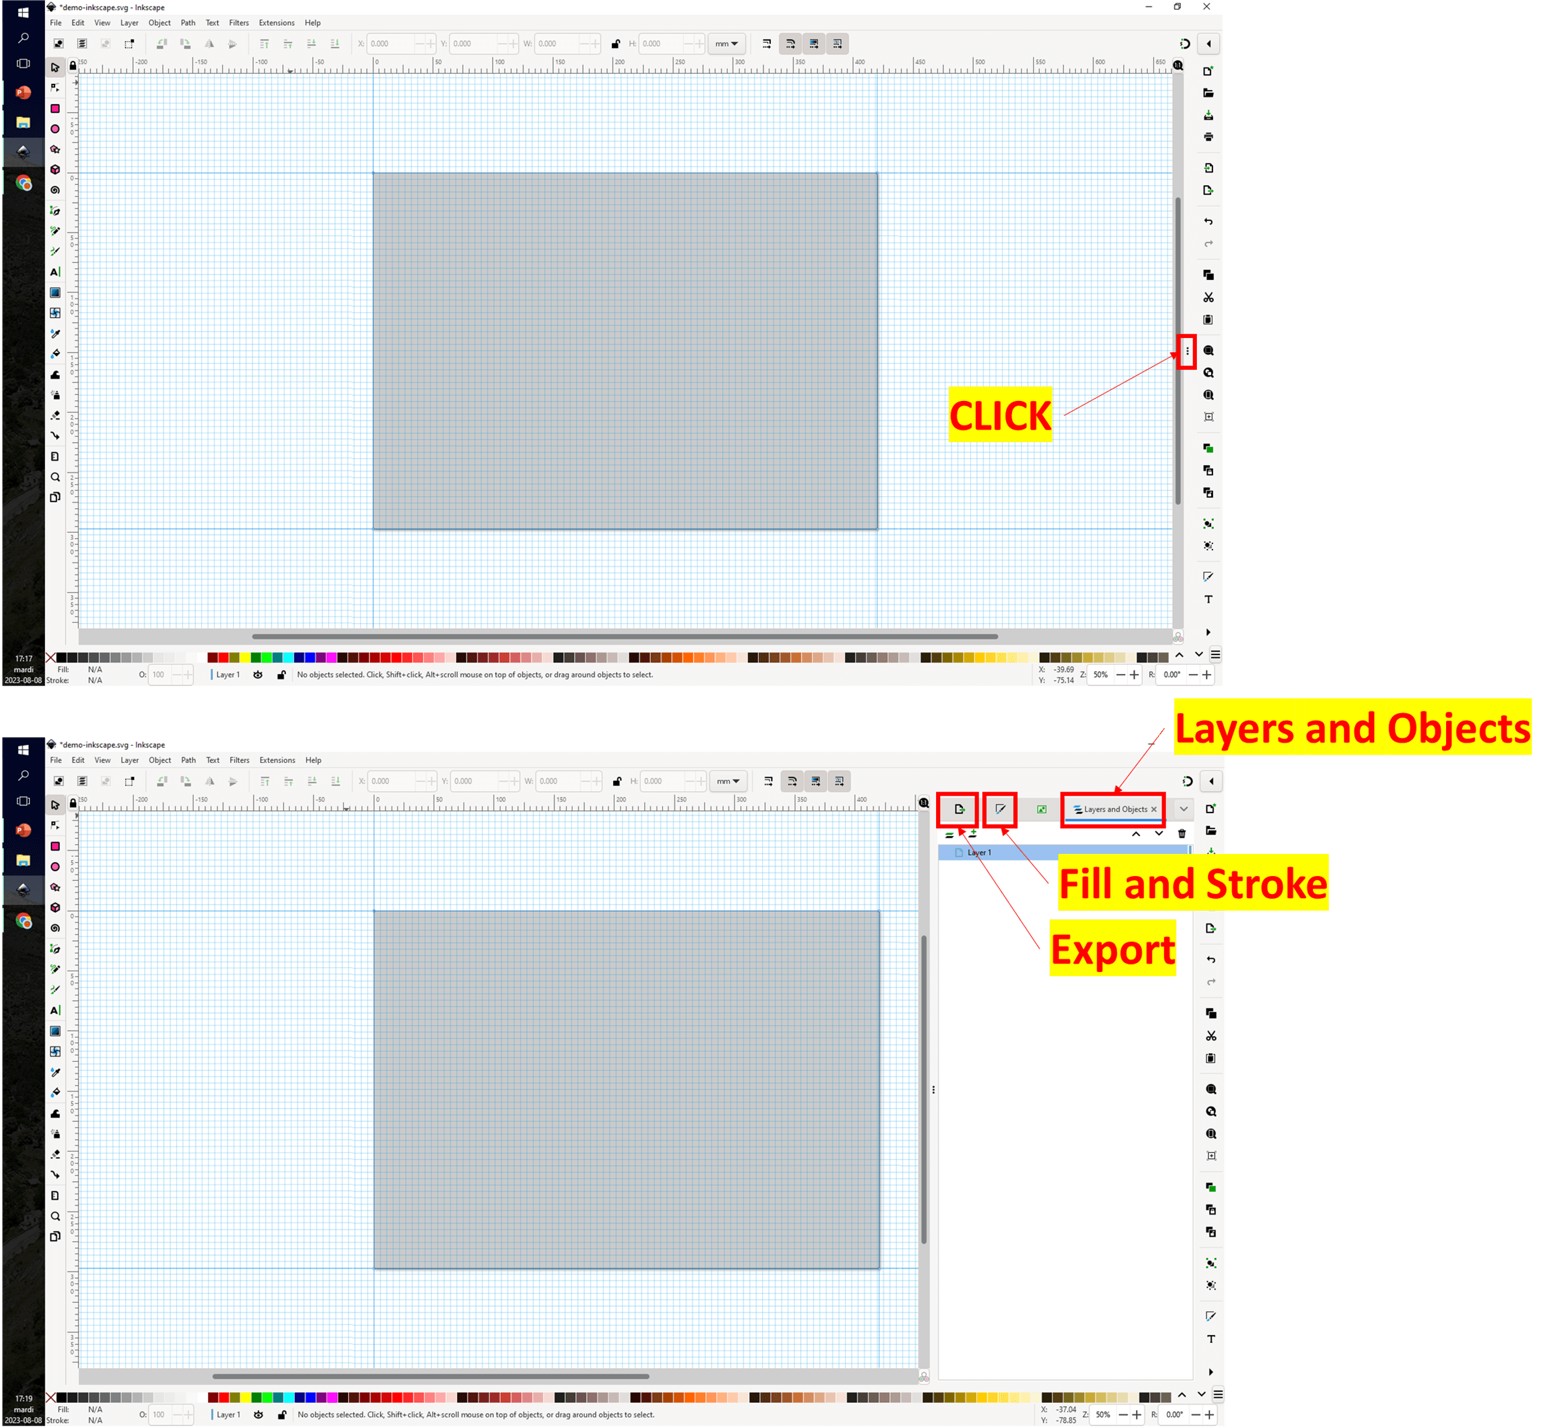
Figure 3: Button to develop the side panel (top) and developed side panel with the 3 essential option panels (bottom).
3. Layers
The better you organize your objects, the easier it will be to manage the poster design. To do so, we recommend creating at least two layers: one for the background and layout, the other for the content. You can create a layer through Layer > Add Layer (or shift+ctrl+N). Figure 4 shows you three examples of layer management.
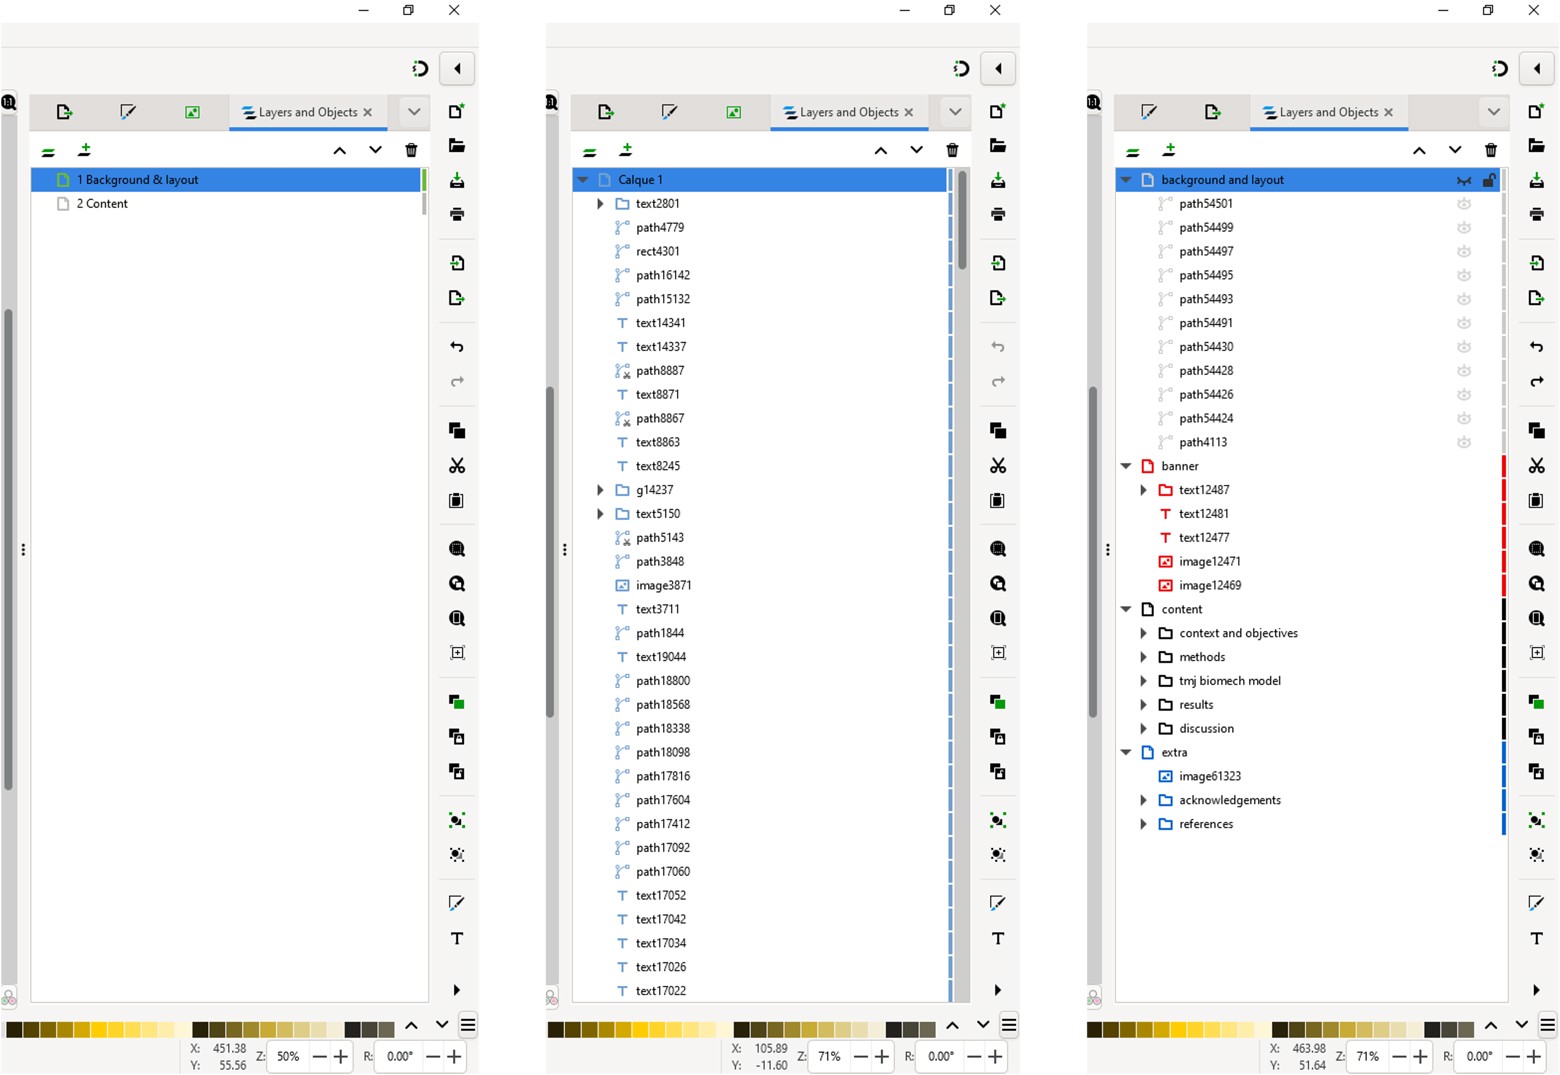
Figure 4: Three examples of layer management: recommended minimal layers (left), one example of a messy objects organization with a single layer (center), and optimal objects organization with multiple layers (right).
4. Width, height and rotation
You will modify shapes of boxes, images, figures a lot. To prevent unintentional mouse handling modifications, we recommend to lock 'change both width and height by the same proportion' by clicking on the lock icon at the top center of the interface (Figure 5).
When you will be familiar with all the shortcuts and the mouse features, maybe you will rotate the interface unintentionally. To prevent this, select View > Orientation > Lock rotation.
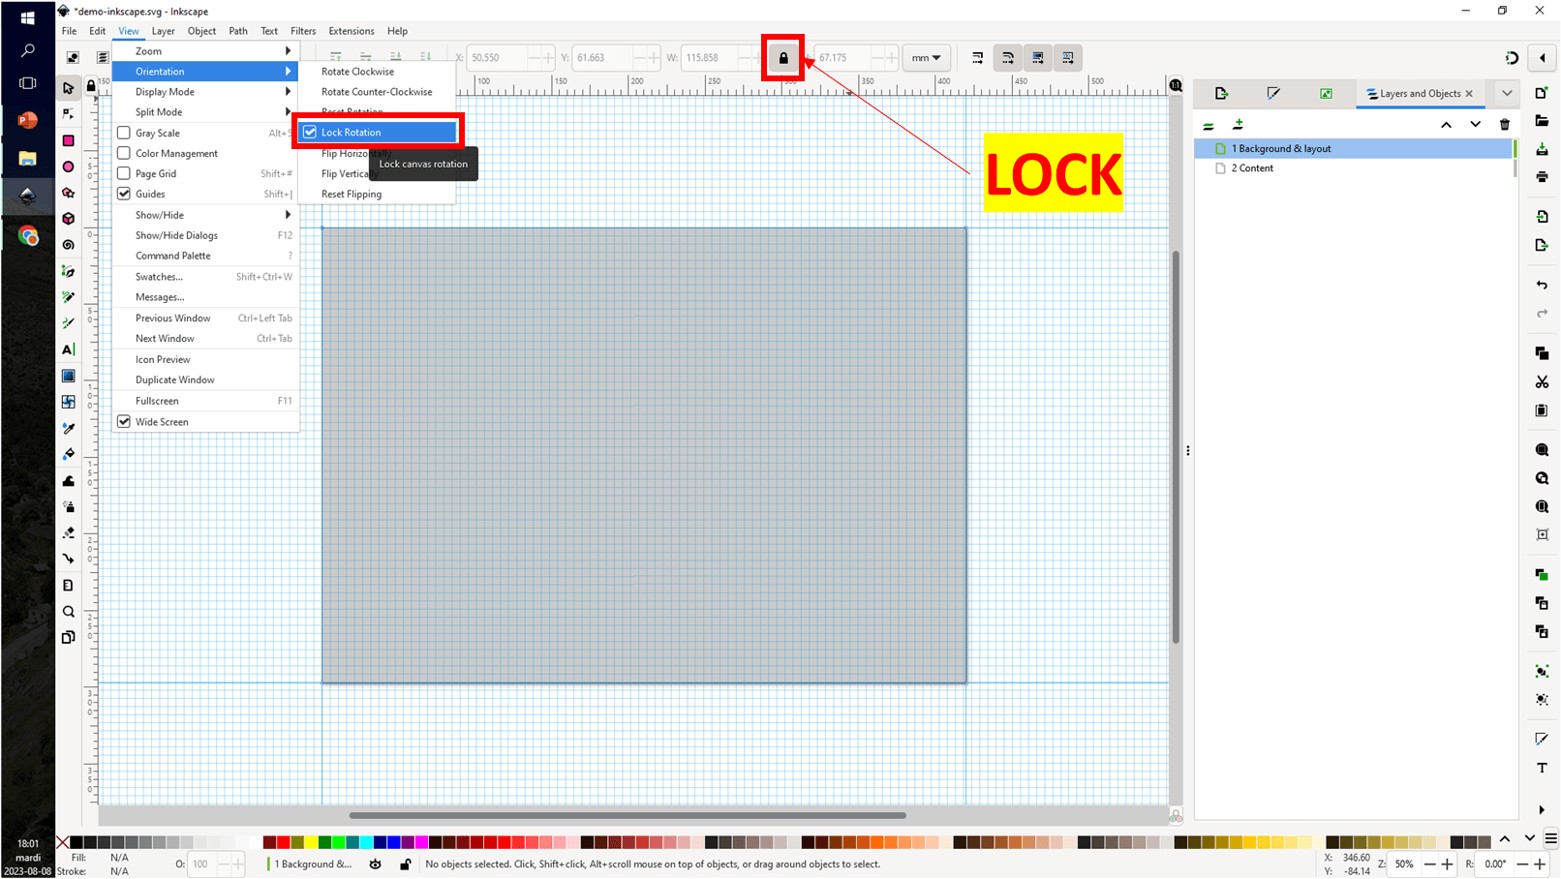
Figure 5: Lock rotation and both width and height changes in the same proportion.
Our guidelines for designing a poster
Once the interface is ready, it’s time to create!
If you are not familiar with the basics and the challenges for designing a poster, you can first take a look at How to Make a Successful Scientific Poster, an article we have written to help beginners design a scientific poster with the design tool of their choice.
Designing a poster can be a lot of trial and error. The following step by step guidelines will help you reduce your number of iterations until you achieve the final version.
1. Start by A4 or letter format (optional). A very good tip from Effective research posters. This way you can easily copy-paste illustrations and graphs from your paper.
2. Background. Select a color, gradient or a sober image that will create contrast.
3. Banner. Keep the top of the poster for the presentation title, author names and institutions.
4. Ideation.
- "Just vomit ideas and dream down onto the page", explains Eric Barker in This is How to Get Unstuck.
- Process of elimination. Delete any extra elements that are not essential to share your key messages. Figures, graphics and tables are always preferable to text.
5. Layout and boxes adjustment. Place the elements you selected and find the best way to organize them.
- Create salience, "Use contrast for emphasis" in Better Posters' words.
- Use the rule of thirds. We always start with dividing the canva in tiers and quarters, then we create the layout by assembling some areas.
6. Aesthetics and customization. Working on the poster's appearance is the final stage.
- Use a 3 color palette. A main color, a shade and a contrast color (+ white or black according to the background color tone) that can match the colors of your institution. Create a 3 rectangle color on your layer for easier use.
- Check if your palette is colorblind-friendly. You can upload your poster on this simulator to verify.
- Do not abuse text modification. Your audience will thank you for reducing the cognitive load required for reading. (BOLD AND CAPS AT THE SAME TIME IS THE MAX)
7. Are you satisfied? If not, repeat steps 5 and 6. But do not fall into the perfectionism trap. You will always be able to improve your poster. Done is better than perfect!
Note that these guidelines are not restricted to the use of Inkscape but can be followed with any other graphics software.
Look at Figure 6 to see the different steps with one scientific poster presented at the 2021 Canadian Society of Biomechanics conference.
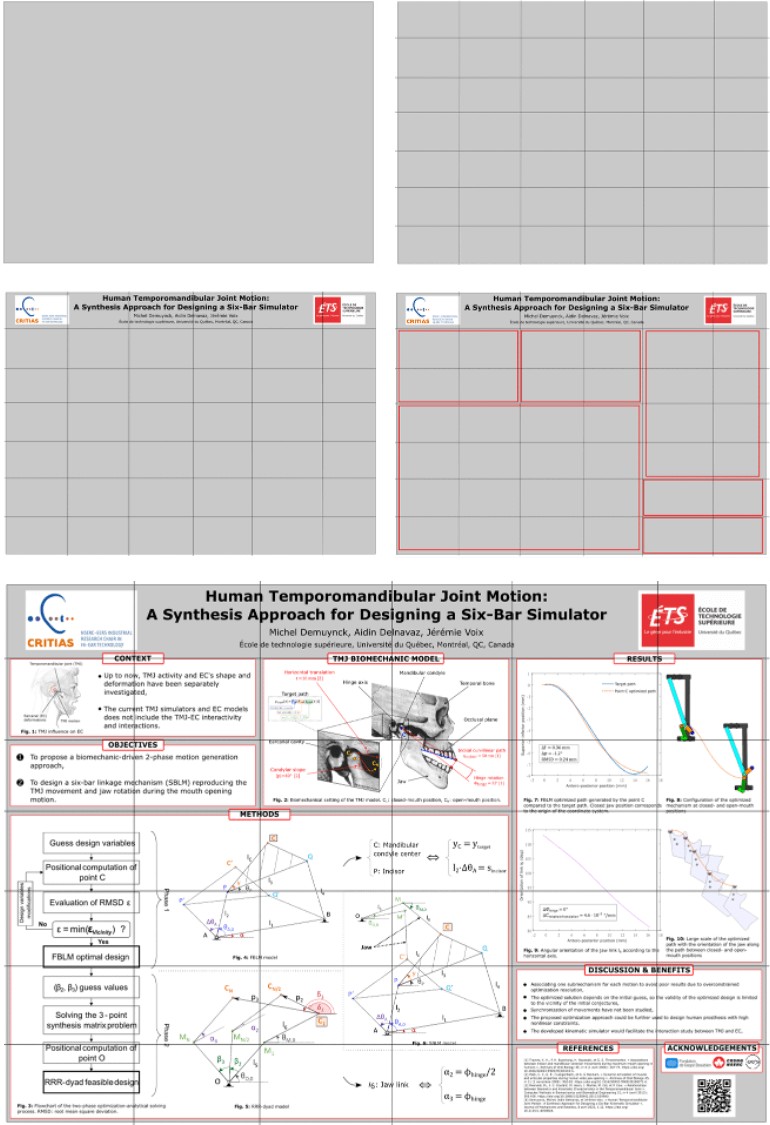
Figure 6: One example of a scientific poster showing the different steps of the design process.
The toolbox to survive in Inkscape
Inkscape is in no way inferior to its paid competitors such as Adobe Illustrator, Canva, Microsoft PowerPoint or Google Slides, which have all the features you need to design a poster.
Here are some of the tools available to design your poster in Inkscape.

Figure 7: Location of the basic features.
Shape tools
Inkscape offers a variety of tools for drawing and editing shapes, lines, and curves.
Here are some of the shape tools available:
- Rectangle Tool (R). Create rectangles and squares. You can adjust the width, height, and corner radius of the shapes as illustrated in Figure 8.
- Ellipse Tool (E). Create circles and ellipses. You can modify the width, height, and rotation of the shapes.
- Bezier Tool (B). Create complex curves and shapes by adding and manipulating control points. It can also be used to vectorize or trim an image.
(Small tip: when using the Bezier tool, press Enter or Spacebar and not Esc when you want to interrupt your drawing to prevent deleting what you have just done)
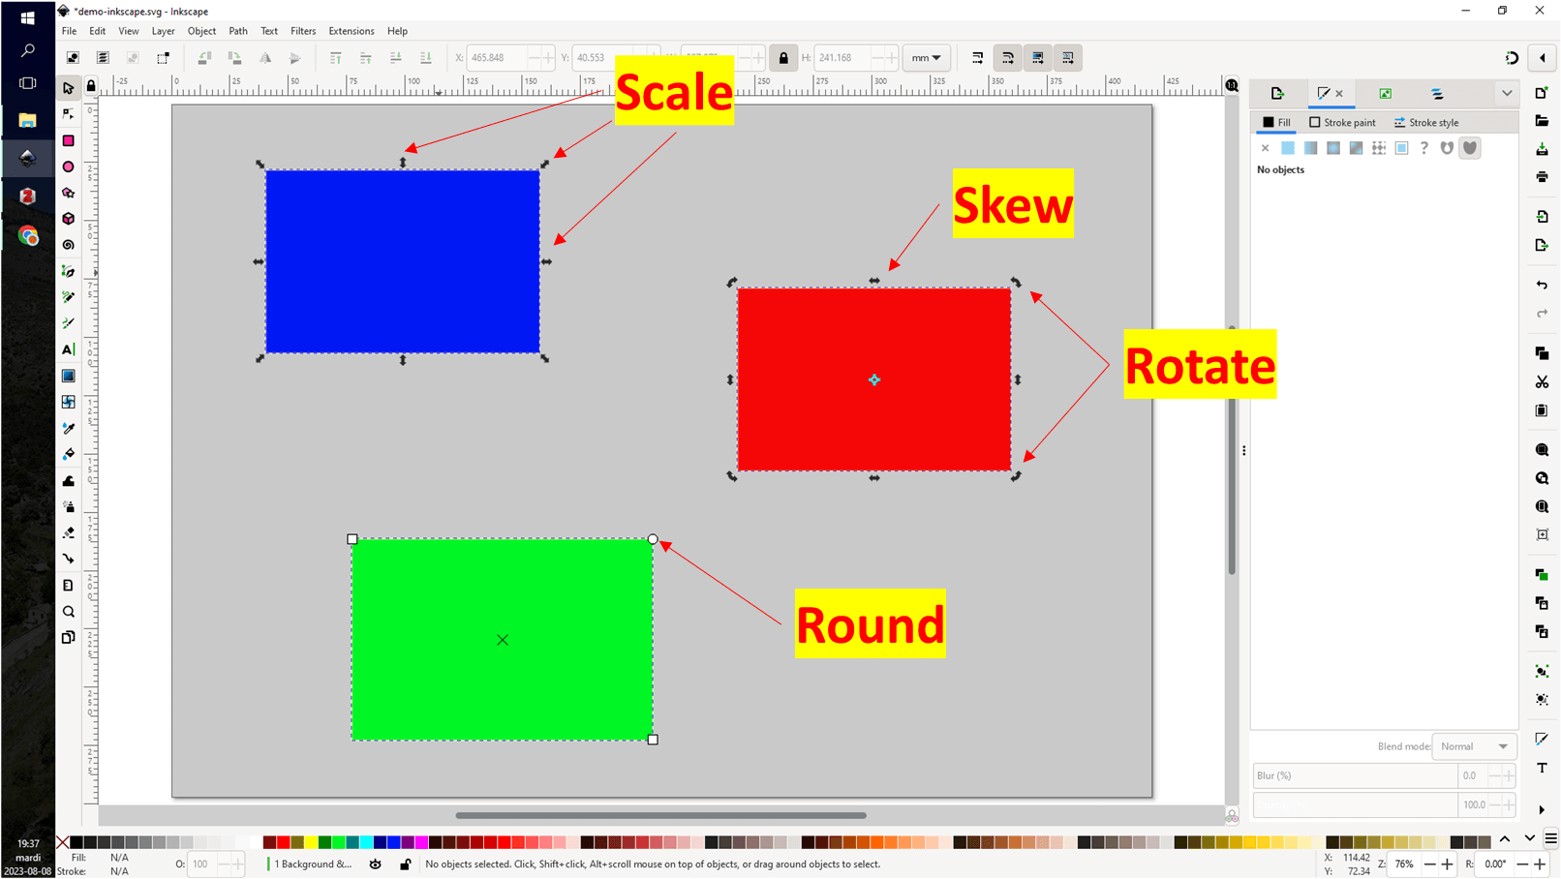
Figure 8: All the three ways to modify a common shape. (not restricted to rectangle)
Text tools
You can add texts (T) and format it on your canva. Choose from a range of fonts, sizes, colors, and styles to customize the text like any text editor software.
Color tools
These color tools can be found in the Fill and Stroke panel in the side panel:
- Fill color. Choose the fill color for an object.
- Stroke color. Choose the color of the object's stroke or outline.
- Opacity. Control the transparency or opacity of an object.
In the left command bar you can find:
- Color picker (D). Select colors from the canvas or any other part of your screen.
- Fill bounded area (U). Fill a specific area within an object or shape with a solid color.
Manipulating and navigating
There are a few gestures for easy navigating and efficient handling of objects on your canva.
- Zoom in (+) or zoom out (-) by scrolling up or down while holding the shift key.
- Select an object by clicking. If you hold the Shift key and move your cursor, you will perform only vertical and horizontal translations or 15 deg rotation increments on the selected object, according to the option activated (cf. Figure 8).
- Select multiple objects by holding down the Shift key while clicking.
- Group (ctrl+G) or ungroup objects (shift+ctrl+G) with a left click after a multiple select.
- Manually enter the X and Y coordinates in the toolbar at the top of the screen to move objects in a more precise manner.
- Apply vertical or horizontal symmetry in the toolbar at the top of the screen to flip objects rapidly.
- Move to the foreground or background to modify the overlay of your objects.
Import and Export options
Inkscape supports the import (ctrl+shift+I) and export (ctrl+shift+E) of various file formats, including SVG, PNG, PDF, and EPS. This allows Inkscape users to incorporate existing graphics and images into their posters and export the final design to a suitable format for printing or digital use.
Bonus: free web apps we found useful for poster design
- vectorizer.com : Convert JPEG and PNG files to SVG files automatically.
- icons8.com, flaticon.com : Copyright-free icon banks.
- draw.io : Useful to create flowcharts and diagrams.
- Pexels.com, unsplash.com : Copyright-free image banks.
- QR code generator : Convert URL into a JPEG or SVG/EPS QR code.
Conclusion
Inkscape is a free vector graphics software that’s perfect for scientific posters and beginners. We hope you find this guide useful to get you started creating your own poster.